Follow Me On Social Media!
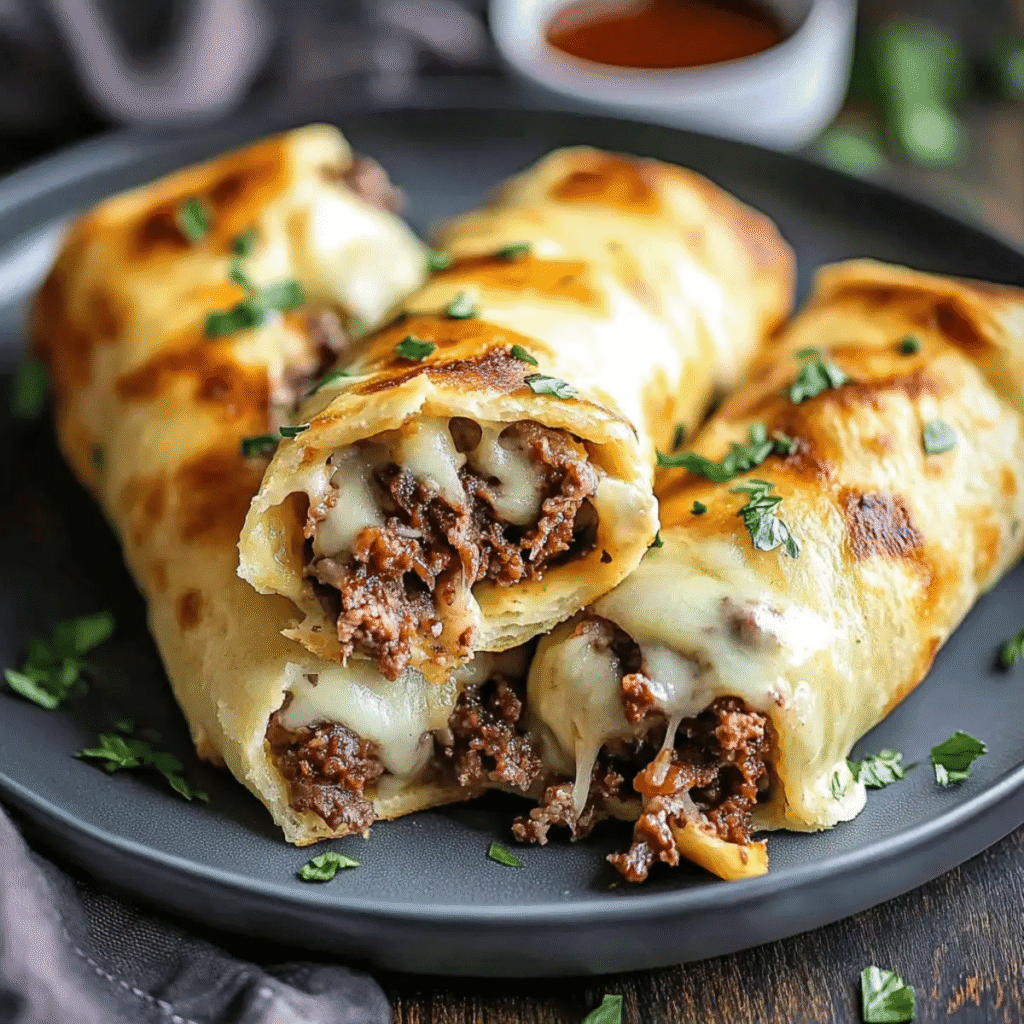
Ultimate Keto Philly Cheesesteak Rolls
Transform the iconic Philly cheesesteak into a low-carb masterpiece with these innovative keto-friendly rolls. By replacing traditional bread with a cheese-based dough made from Monterey Jack, eggs, and almond flour, you’ll enjoy all the savory flavors of the classic sandwich without the carbs. The result is a golden, crispy exterior that encases tender seasoned beef and colorful vegetables, delivering satisfying comfort food that fits perfectly into your ketogenic lifestyle.
Why You’ll Love This Recipe
- Low-Carb Indulgence – At just 4g of carbohydrates per roll, you can enjoy the rich flavors of a Philly cheesesteak without compromising your keto macros or blood sugar levels.
- Cheese-Based Dough – The innovative fathead-style dough creates a sturdy, flavorful vessel that’s naturally grain-free and holds together beautifully while providing extra protein and healthy fats.
- Quick Preparation – Ready in just 30 minutes from start to finish, this recipe delivers restaurant-quality results with minimal hands-on time, making it perfect for busy weeknight dinners.
- Customizable Protein Options – While ground beef offers convenience and affordability, you can easily substitute sliced ribeye or sirloin for a more authentic Philly experience with varied texture and flavor profiles.
- Meal Prep Friendly – These rolls reheat exceptionally well and can be frozen for up to three months, allowing you to batch-cook and enjoy convenient grab-and-go keto meals throughout the week.
- Family-Friendly Appeal – Even non-keto family members will love these cheesy, savory rolls, making them an excellent option for mixed-diet households without needing to prepare separate meals.
Ingredients You’ll Need
For the Cheese Dough
- 2 cups Monterey Jack Cheese – Provides the base for the dough with excellent melting properties and mild flavor; can substitute with sharp cheddar for more pronounced taste or provolone for authentic Philly flavor
- 2 large Eggs – Essential binding agent that creates structure and stability in the cheese dough while adding protein and helping achieve the proper texture
- 1 cup Almond Flour – Adds substance and helps absorb moisture while keeping the recipe low-carb; use finely ground blanched almond flour for best texture (coconut flour can substitute at 1/3 cup due to higher absorbency)
For the Savory Filling
- 1 pound Ground Beef – The protein foundation offering convenience and even distribution throughout the rolls; 80/20 blend provides ideal fat content for flavor and moisture (sliced ribeye or sirloin can substitute for traditional texture)
- 1 cup Bell Peppers – Adds sweetness, crunch, and vibrant color; use a mix of red, green, and yellow for visual appeal and varied flavor notes
- 1 cup Onions – Provides essential aromatic sweetness and authentic Philly flavor; yellow onions offer classic taste while red onions add slight sharpness and beautiful color
Step-by-Step Instructions
Preheat and Prepare
Preheat your oven to 350°F (175°C) and line a large baking sheet with parchment paper to prevent sticking and ensure easy cleanup. This moderate temperature allows the cheese dough to set properly without burning while developing a golden exterior.
Cook the Filling
Heat a large skillet over high heat and add the ground beef, diced bell peppers, and onions, cooking for 5-7 minutes while breaking up the meat with a spatula. The high heat creates a flavorful sear on the beef while softening the vegetables and allowing excess moisture to evaporate, preventing soggy rolls.
Create the Cheese Dough
Combine the shredded Monterey Jack cheese, eggs, and almond flour in a large mixing bowl, stirring until a smooth, cohesive dough forms. The warmth from your hands or a brief microwave session (15-20 seconds) can help the cheese become more pliable and easier to work with.
Form the Dough Circles
Divide the cheese mixture into four equal portions and spread each portion on the prepared baking sheet into circles approximately 4 inches in diameter and 1/4-inch thick. Use wet hands or a piece of parchment paper to prevent sticking while achieving uniform thickness for even cooking.
Bake the Dough Base
Bake the cheese circles for 10-12 minutes until they turn golden brown around the edges and develop a bubbly, slightly crispy surface. Watch carefully during the final minutes to prevent over-browning, as the thin dough can darken quickly.
Assemble the Rolls
Remove the baked cheese circles from the oven and immediately layer the cooked beef and vegetable mixture down the center of each circle while still warm and pliable. Carefully roll each circle around the filling, working from one side to the other and using a spatula if needed to lift and fold the cheese dough.
Final Bake
Return the assembled rolls seam-side down to the oven for an additional 5 minutes to meld the flavors, seal the seams, and ensure the filling is heated through. This final bake also helps any cheese that may have separated reincorporate with the dough for a cohesive texture.
Recipe Notes & Tips
- Cheese Temperature – Allow the shredded cheese to come to room temperature before mixing, as cold cheese is more difficult to blend with eggs and almond flour and may result in a crumbly dough that doesn’t hold together properly.
- Dough Consistency – If your dough feels too sticky to handle, refrigerate it for 10-15 minutes to firm up the cheese and make it more manageable; if too dry or crumbly, add a teaspoon of water or an extra egg yolk.
- Moisture Control – Drain any excess fat from the cooked beef mixture before assembling to prevent the cheese dough from becoming soggy and potentially breaking apart during the rolling process.
- Rolling Technique – Work quickly while the cheese circles are still warm and pliable, as they become brittle and prone to cracking as they cool; if they do cool too much, return them to the oven for 30 seconds to soften.
- Even Cooking – Rotate the baking sheet halfway through the first bake to ensure uniform browning and prevent hot spots in your oven from creating unevenly cooked dough circles.
- Make-Ahead Option – Prepare the beef filling up to two days in advance and refrigerate, then simply reheat before assembling the rolls for an even quicker meal preparation.
Nutritional Information
- Prep Time: 15 minutes
- Cook Time: 15 minutes (includes both baking sessions)
- Total Time: 30 minutes
- Servings: 4 rolls (1 roll per serving)
- Calories: 250 kcal per roll (estimated based on standard ingredients and portion sizes)
Perfect Pairings
- Sugar-Free Marinara Sauce – A warm, herb-infused marinara provides tangy contrast and moisture while adding negligible carbs, perfect for dipping or drizzling over the finished rolls.
- Crisp Side Salad – Pair with a fresh garden salad dressed in olive oil and vinegar to add refreshing crunch and additional nutrients while keeping the meal light and keto-compliant.
- Roasted Vegetables – Serve alongside roasted Brussels sprouts, asparagus, or cauliflower for extra fiber and micronutrients that complement the rich, cheesy rolls.
- Pickled Vegetables – Traditional Philadelphia-style pickled hot peppers or a side of pickles adds acidic brightness that cuts through the richness of the cheese and beef.
Ideal Occasions
- Weeknight Family Dinners – The quick 30-minute preparation time and crowd-pleasing flavors make these rolls perfect for busy evenings when you need satisfying comfort food without extensive cooking.
- Meal Prep Sundays – Batch-prepare these rolls for convenient lunches throughout the week, simply reheating in the microwave or oven for a hot, satisfying midday meal.
- Game Day Gatherings – Serve these as keto-friendly finger food during sports events or casual entertaining, offering a guilt-free alternative to traditional carb-heavy snacks.
- Low-Carb Potlucks – Bring these impressive rolls to gatherings to showcase how delicious and satisfying ketogenic eating can be while accommodating guests with dietary restrictions.
Storage & Serving Tips
- Refrigerator Storage – Store completely cooled rolls in airtight containers for up to 3 days in the refrigerator, separating layers with parchment paper to prevent them from sticking together.
- Freezer Storage – Wrap individual rolls tightly in plastic wrap, then place in freezer bags for up to 3 months; freeze them after the final bake for best texture upon reheating.
- Reheating Method – Reheat refrigerated rolls in a 350°F oven for 8-10 minutes or microwave for 60-90 seconds; frozen rolls should be thawed overnight in the refrigerator before reheating for even warming.
- Serving Temperature – These rolls are best enjoyed warm when the cheese is soft and gooey, though they can be eaten at room temperature for packed lunches or picnics.
Creative Variations to Try
- Chicken Philly Variation – Substitute the ground beef with diced chicken breast or thighs seasoned with garlic powder and paprika for a lighter protein option with different flavor notes.
- Mushroom Lover’s Version – Add 1 cup of sliced mushrooms to the filling mixture for earthy umami depth and extra texture that’s traditional in many Philly cheesesteak preparations.
- Spicy Southwest Twist – Incorporate diced jalapeños, cumin, and chili powder into the beef mixture, then top with pepper jack cheese instead of Monterey Jack for a zesty kick.
- Pizza-Style Rolls – Mix Italian herbs into the dough and add pepperoni or Italian sausage to the filling, then serve with warm marinara for a keto pizza roll experience.
Troubleshooting Common Issues
- Dough Falls Apart When Rolling – The cheese circles cooled too much and became brittle; warm them in the oven for 20-30 seconds until pliable, or next time work more quickly while they’re still warm from the initial bake.
- Rolls Are Soggy or Greasy – Excess moisture from the beef filling soaked into the dough; always drain cooked meat thoroughly and pat dry with paper towels before assembling the rolls.
- Cheese Dough Won’t Come Together – The mixture may be too cold or the cheese wasn’t finely shredded enough; microwave for 15-20 seconds and ensure you’re using pre-shredded or finely grated cheese for proper binding.
- Rolls Open During Final Bake – Insufficient sealing or overfilling caused the rolls to burst; use less filling (about 1/4 cup per roll), ensure the dough overlaps when rolling, and place seam-side down on the baking sheet.
Why This Recipe Works
The success of these Keto Philly Cheesesteak Rolls lies in the chemistry of the fathead-style dough, where melted cheese acts as both the primary structure and flavor component. When cheese is heated, its proteins denature and combine with eggs and almond flour to create a pliable, bread-like consistency that’s surprisingly sturdy yet tender. The almond flour absorbs excess moisture while providing subtle nutty flavor and additional healthy fats that support ketosis. Meanwhile, cooking the beef filling over high heat develops the Maillard reaction—a complex browning process that creates hundreds of flavor compounds—while the vegetables caramelize slightly, adding natural sweetness that balances the savory elements. The two-stage baking process ensures the dough sets properly before rolling and then melds all components together during the final bake, creating cohesive flavor integration. At just 250 calories and 4g net carbs per roll, this recipe demonstrates that low-carb eating doesn’t require sacrificing taste or satisfaction.
Final Thoughts
These Ultimate Keto Philly Cheesesteak Rolls prove that following a ketogenic diet doesn’t mean giving up beloved comfort foods—it simply requires creative reimagining of traditional recipes. By leveraging the natural properties of cheese to create a functional, flavorful dough, you can enjoy all the satisfying elements of a classic Philly cheesesteak while maintaining your nutritional goals. The combination of protein-rich beef, fiber-filled vegetables, and healthy fats from cheese and almond flour creates a balanced, satiating meal that will keep you full for hours. Whether you’re strictly keto, simply reducing carbohydrates, or cooking for mixed dietary preferences, these versatile rolls deliver universal appeal. For an even lighter option, consider using lean ground turkey or chicken breast, which can reduce the calorie count to approximately 200 per roll while maintaining the protein content that makes this recipe so satisfying and supportive of your wellness journey.